HOME BOOKING THE BLAT HERE THE PROPERTY OUR BLATS ATTRACTIONS THE GITES LIFE AT LA FOIE CONTACTS EDITORIAL "BIT OF DAFT"
The French Blatting Company
![]()
Life at La Foie
ASTRONOMY
The New Observatory
We'll start with the concrete pad.
.jpeg)
.jpeg)
.jpeg)
Have you noticed the "leaf" on the pad on the far side about middle. Well, closer inspection reveals.....
.jpeg)
Isn't that nice, nature in it's full glory.
These are the wheels that will be fitted to each corner of the tin shed, when it arrives!
.jpeg)
.jpeg)
The wheel runs on a copper pipe as a bearing.
This is a picture of Vergonnes, about 6 kms from us. This is using the Sony compact at 720 mm
.jpeg)
Using the 2003 mm lens and the 5mm eyepiece I can see right into the windows!
This is the shed that is being delivered, hopefully on the 8th October (2014) - No it was something else delivered on the 8th. I'm still waiting for this shed. The original one was slightly smaller but they haven't any in stock so are delivering this one. Of course I had to threaten to cancel the order first. Latest position (8/10/14) is that we are to wait 10 days for it to come into stock then 3 days for delivery. This despite the fact that they cancelled the first one ordered because it wasn't in stock and the larger one was.

The spec is:
Metal
shed 2 slopes,
Dimensions
(L: W: H): 1.95 x 1.23 x 1,91m
Floorspace:
2,39m²
Comes
with lockable double doors opening
All
screws are supplied with a plastic cap for Security
Comes
with dark green two-tone paint
Comes
with hooks for ground mounting
Includes
louver
12-year
guarantee!
On Monday 20th October we went to Chateaubriant to get some new shoes and order a new battery charger/maintainer, my Halfords charger of 20 years had just given up and gone to the charge in the sky. In the afternoon, Lynne jumps up to look out the window and announces a large blue van has arrived and the man is coming to the house. I went out and guess what, he had my shed, at last. Ordered it on line with a delivery date of 10 days, that was 8 weeks ago!
The following day we were out all day at the hospital, and shopping so I couldn't start building. I started at 0900 on Wednesday morning.
.jpeg)
The shed as delivered, I suppose you can call that a flat pack.
.jpeg)
The stuff inside.
.jpeg)
All laid out ready to be built.
.jpeg)
Two days work and, apart from doors it's built. The panels are razor thin and as sharp, I have about 10 cuts on my hands and fingers.
.jpeg)
Two doors need about 10 minutes work to finish then the hinges to be fitted and hung. Will finish in the morning.
.jpeg)
Here you go, my baby, putting her baby to bed.
Friday morning and an early start, well 0900 is early for me these days, because I want to finish this today. So, before Lynne is ready I finish and hang the doors. We then measure the brackets for the wheels and start cutting them to the right length. I want to put a plate on the inside but we find it won't fit due to the shape of the corrugation. So we use plain and spring washers. The first one takes ages, the next 3 were much quicker.
.jpeg)
Two wheels on my wagon.
We then get this side off the stands and onto the wheels and then I lift the other side. DISASTER The wheeled side rolls back and the whole shed twists and distorts. It doesn't take long for us to get it straight and it looks like no real damage has been done. We then chock the wheels and lift the other side on to the stands and get the two wheels on that side on. We now have a shed on four wheels.
.jpeg)
Like this.
.jpeg)
And just to show it works the shed is rolled away leaving the telescope exposed. When we are using it for real it will be rolled much further back, about half way into where the old shed is now.
.jpeg)
This is the Wedge. It is fitted between the tripod and the telescope and converts the mount from a fork altaz (altitude-azimuth) to an equatorial. Now you think I know what I'm talking about, I have no idea, that's what it says in the book. You need an Equatorial mount to take photos.
.jpeg)
The whole thing, looks impressive.
But we're not finished. I went to Brico Marche to get the straps to support the front panels after the lower rail had been removed, 4 right angle brackets to stiffen the whole thing up and some screws and nuts to hold all the straps and brackets on. As luck would have it, I picked up an odd screw to get the correct nuts and the upshot of this was that I had about 60 6mm nuts instead of 5mm nuts. So I had to go back to change them! This took 45 minutes which meant we ran out of time and didn't get finished.
So tomorrow I've got to fit the 4 right angle brackets and make a better jobs of holding the front panels. Then fit the shelf (to hold the two cases and all the paper you can see strewn all over the floor.) Final job will be to wire it all in. With a bit of luck we should be finished by lunch but something tells me it'll be 1700. Her indoors, who MUST be obeyed, says we're having a rest today. No problem says I, having noticed it's raining. So we'll finish it tomorrow, Sunday 26th October.
It's now 20th November. The work above did get done that week. However there was still bits to sort out. Firstly the battery was pulling the panel it was fixed too off. I had to re-site the front left hand wheel as the panel had buckled. I fitted it a bit further back and used 2 metal plates, one each side to spread the load. I also fitted the battery to these heavy duty metal plates. Problem was it then pulled the plate over buckling the side panel. So I needed to give this some serious thought. Other problem was that having cut the bottom rail off (to allow the shed to slide back past the telescope) the front was spreading apart. Now, lets think......
.jpeg)
The battery now sits on a wheeled cradle and is cable tied to the brackets on the side panel.
.jpeg)
The front is held together by this bar. One end swivels on a bolt and the other end fits over a bolt by a slot cut in the bar. You open the bar, push the shed back past the telescope and then refit the stay bar.
.jpeg)
Finally, two corners are now chained to the concrete. (you can see the buckled panel behind the wheel)
I will get two 3 metre planks tomorrow to make the runway for the shed to be pushed all the way back and that will be the observatory finished and ready for use. All we need is some clear skies at night.
DISASTER
On the night of 14th/15th January we had very strong winds and heavy rain. In the morning at 0900 we had to go to the hospital at Angers and as we drove out Lynne screamed and said "look at the shed". I left it as it was otherwise I'd be late for the hospital and it was chucking it down and still blowing a gale. When we got back this is what I found.
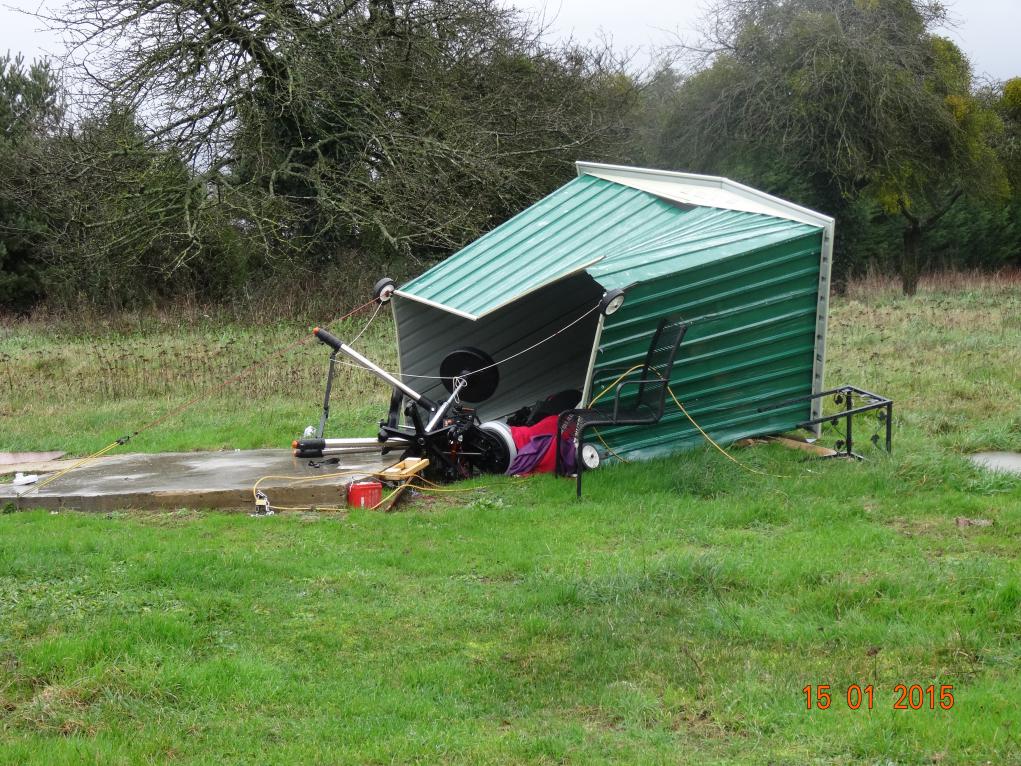
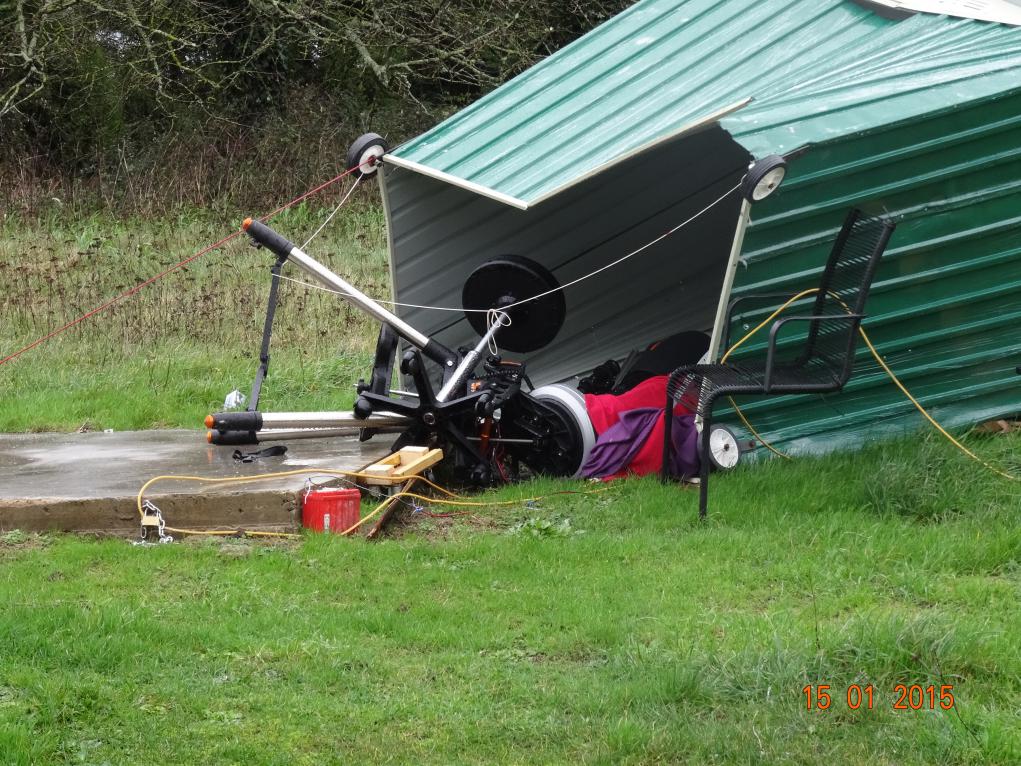
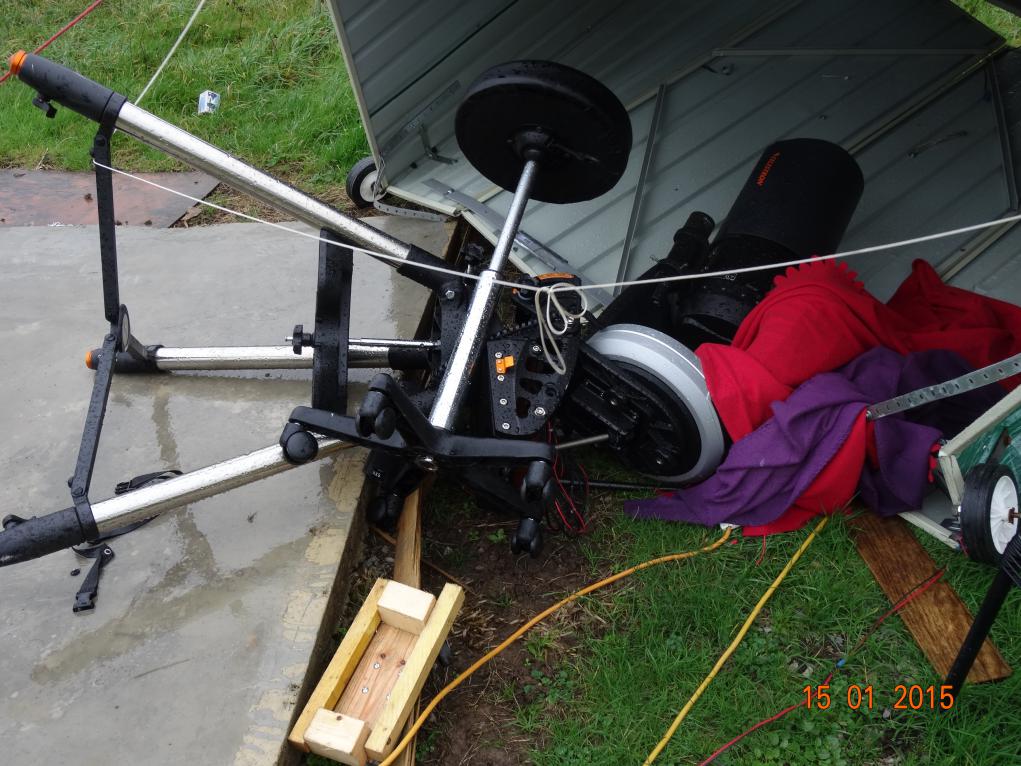
Looks horrendous doesn't it. But it wasn't as bad as it seemed. The telescope didn't actually hit the ground, only the forks it's mounted on. We "walked" it into the workshop (it's very, very heavy) and dried it down by blowing the water off with the airline and then I checked it by looking at the house with a 40mm eyepiece. It was OK. I'll let it dry out for a few days and then check the GOTO computer. I'm letting it dry on it's own overnight and I'll then put a small heater under it tomorrow.
26th March 2015
Observatory Mark 3. Had I done this in the first place I wouldn't have had to do it three times and wouldn't have had the extra expense. The Mk 3 is made of 18 mm ply for the sides and 12 for the door.
.jpeg)
A sheet of ply, 2 mtrs x 1 mtrs x 12 mm
.jpeg)
A door.
.jpeg)
Nearly finished
.jpeg)
Finished with telescope and battery inside. Just got to lay it down, to get it out of the garage, and wheel it over to the concrete pad. Then fix the anchor chains to it and Roberts your mums brother.